STAMP ON!!!

Friday, May 30, 2008

Check out what Queen Shelli has been up to...

Just a quick note to let you know that Queen Shelli (Shelli Gardner, CEO of Stampin' Up! ®) has noted on a TV show that it is big doings using stamps to dress up your home decor...so check out what she did on the local show in Utah...here is the link...Studio 5
Isn't she just great!?!?!

Wednesday, May 28, 2008

Check this baby out!

OK - you KNOW that stamping is my therapy (isn't it yours too?!?!?!) - so I have been organizing, cleaning my stash out and stamping...really helps...so look what I came up with for a 30 card swap I am in...of course I am a lil behind...story of my life! But I thought it came out pretty lovely myself...hope you like it!


STAMPS: Boho Backgrounds, Elegant Cheer

INK: certainly celery, not quite navy, craft white

PAPER: certainly celery, not quite navy, whisper white

ACCESS: Crafters Tool Kit,Punches: scallop, 1 3/8 circle, 1 1/4 circle, 1" circle, slit; 5/8 celery grosgrain ribbon, White EP

Friday, May 23, 2008

Two More Spring Fling Pics

Here are two more of the make and take items we made at my demonstrator event called Spring Fling. They are an envelope gift card holder and a little photo book made with chop sticks...too cute! Here are pics of the outside and the inside of both...ENJOY!


Tuesday, May 20, 2008

family note

Please go to the About Us page for a family update and prayer request...

Thursday, May 15, 2008

Here is some stuff from Spring Fling 08


Remember those lil paper games you played with your girlfriends - you know...to see who you would marry or even (gasp) kiss!!! These are those paper things - upside down! They hold candy nicely in our designer series paper! Anyway - Stephanie and I won both these holders at our Up up up-line Tina's Spring Fling 08...we had a blast and I have a few more things to post...but I have just posted my fingers off today and you will need to be patient and wait...LOL

My mother's Mother's Day gift


I wanted my mom's card to somewhat match the gift - so forgive me if I have posted a card with a retired set...I used the sunflower set (sniff, sniff)...however, the Designer Series paper is new, as well as the current sky blue in color paper...If you like the finale shot of the CD crate with flowers, I have more but they are listed on the ReenS Creations page ...Normally I would put retired stuff on those pages only, but I loved this too much and from the counts I see not everyone checks out the other pages as much...so ENJOY....cuz I adore this project!!


Card from my DDSS 10

Great card from my DDSS 10. I love the shaving cream technique. Once I got this card I knew that I wanted to use it on another card that I made - which is posted....can you find it?


Friday, May 9, 2008

ABC Book

For those of you who went to convention last year, this item will seem familiar. I tweaked a project I had already done with a retired simply scrappin set - and since I wanted it to be current - I used this simply scrapping set that is current. I am sending it to a friend of mine up north as a sample for her business. I used the chip board, the on board bitty book and the Summer Days simply scrappin kit. If you use a dry erase marker - the kiddies can write on the plastic pages for practice and then wipe it off and redo again and again!!! Cute, eh?!?!?


Check out this storage system!!!

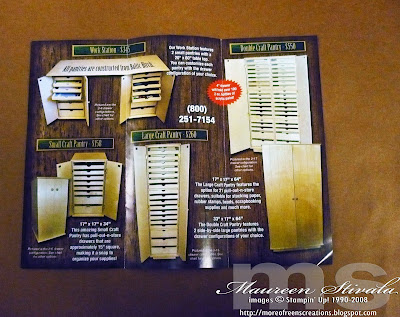
Ok fellow stampers - such a deal I have for you!! I have attached a copy of a flyer that I took pictures of - so I hope you can see the stuff...it is really great and made well. I met the owners of this company last month in Allentown PA at a lil stamping convention and they were sooo nice! Not only that - I had made the mistake of walking on by their display because I mistakenly assumed their products cost as much as those I have seen in our stamping craft trade magazines. Well - let me tell you - they are not too much!! I took the flyer to my up-line meeting and Tracy's husband said he couldn't even make that for what they are charging and that it was a really good deal! I saw the product myself and it is very well made. The wood is ready for paint or stain or you can leave it beautiful natural wood. You can LOAD your stamps in the trays - and pull out trays as you want or need - stack 'em - use the stuff - and then at the end of the day (or weekend!! LOL) you can grab 'em and put 'em back! WOW! So I plan on getting myself one with all short drawers for my non SU stamps and for some SU that are retired. I asked about the shipping if I did not buy one at the convention site, and they said - no worry - call and we can arrange a meet up - you see the peeps travel the country with all the shows/conventions - so there is always a time they can meet you for a pick-up....Now THAT'S what I call SERVICE!!! And no - I am getting no kick-back for this...I am paying full price for my cabinet ($260). I just HAD to share with you the product. It's not often you find stuff like this, so when you do...your stampin' sistas NEED to know!! Click on the pics so they get big enough to see the PRICES!! GO GET 'EM BABY!!!!!!


Wednesday, May 7, 2008

I think I have been neglecting my studies...

Alrighty then.....I believe it is time I really buckle down and "Git R done!!" if you know what I mean...I have been working SOOO long on this degree, but having to stop out for several years due to two more bouts of cancer with Bob - then the supporter/survivor depression as well as two moves, a change in jobs, picking a topic that is difficult for me, having 3 surgeries in two years myself...sigh...ok...want some crackers with that w(h) ine?!?!?! I need to finish - rather than excitement, it now feels like a monkey on my back. It is also difficult since my mom was my biggest fan - in everything I do - but she doesn't even know me these days....I actually am dreading seeing her on Mother's day - doesn't that sound awful? It just hurts too terribly bad...I was just telling someone the other day - Alzheimer's is a disastrous disease for so many reasons - but - having been with my husband through 3 primary cancers in the past 16 years and ALL the ramifications of surgery/ illness - like surprise career and income changes - illness hits more than your body....but anyway - I feel like we had SOME control - the choices we made for the best doctors - going to NYC to Sloan Kettering - treatment decisions -all of that...and Bob and I together worked through it all....but with Alzheimer's - the person you love is still in front of you - but not there at the same time - you need to grieve the loss of your loved one while they are still with you and you are alone in your battle against THEIR disease...sucks worse than the big C in my opinion. OK - off my soapbox about illness....I have to get to my writing....it is just tooooo tempting to be on the computer and NOT go on the net....arghhhhh....I think maybe I need a 12 step for the computer!!! YIKE-EEESSS!!! Later dude!


Friday, May 2, 2008

5 petal punch flower directions

I will need to come back and add some pics but wanted to get the directions for this flower up if you have not already figured it out...

In the flower on the right I did the following steps:
  1. Punched out 2 purely pomegranate 5 petal flowers; punched out 1 pumpkin pie 5 petal flower and 1 old olive 5 petal flower.
  2. I took one of the purely pomegranate flowers and put dotto removable sticky on it and attached it to a piece of scrap paper
  3. I took the 5 petal punch and re-punched it again (hold the punch over the actual way you first punched out the flower and rotate it to the left or right - so the punch will cut the petals into 2 petals - hence producing a 10 petal flower layer)
  4. I used direct to paper of the same color on the full purely pomegranate and the pumpkin pie flowers- and I used direct to paper with craft white on the now 10 petal flower.
  5. I used a square punch (one corner of it anyway) to snip out the end V piece of the 2 of the larger flowers. You could also just snip it with your paper snips. I liked the consistency of the punch.
  6. I put the old olive flower through my crimper
  7. I stamped the circle from the flower set in pretty in pink on whisper white paper and punched it out with the small circle punch.
  8. I layered large 5 petal purely pomegranate, then the pumpkin pie, then the small now 10 petal flower, and lastly the small circle flower center done in pretty in pink on white.
  9. I molded the petals on all flower layers up with my hands
  10. I cut the petals apart on the old olive and attached them to the back of the flower randomly as petals.
  11. Add flower to card as embellishment.
  12. DONE!